A garden hose does one thing: it points where you left it. Two stepper motors, a Raspberry Pi and a few euros of driver electronics turn it into something that aims — across the lawn, over the flower bed, back again, without anybody standing in the wet grass.
This page is the build: the parts, the wiring, the driver settings and the first control script. The software that drives it is Nicesprinkler.
Watch it run — two minutes of the machine watering a real lawn.
Total cost of the parts below: about 142 EUR.
The idea is to create a simple 3D sprinkler design controlling the flow from a garden hose in 3D style with two motors. For a proof of concept we start with one motor.
Please find below how the project made progress so far.

https://wiki.bitplan.com/index.php/Sprinkler#How_much_and_how_often.3F
The video shows the principle of moving the garden hose with the motor.
File:LawnSprinkler2024-06-30 0956.mp4
| Part Name | Description | Quantity | Price/Total (EUR) |
|---|---|---|---|
| ACT Motor 23HS8430 1.9 Nm | 2 | 17.90 / 35.80 | |
| TB6600 Stepper Motor Driver | 2 | 9.90 / 19.80 | |
| ARM Cortex-A53 with Wi-Fi and Bluetooth | 1 | 44.45 / 44.45 | |
| 4 flange couplings | 4 | 2.50 / 9.99 | |
| Option 1: Adapter for Aldi Ferrex battery, charging cradle, gray PLA+ |
1 | 11.90 / 11.90 | |
| Option 2: Power supply transformer for LED strips and lighting |
1 | 12.99 / 12.99 | |
| Jumper wire cables for breadboard connections | 1 | 4.99 / 4.99 | |
| Aluminum case with cooling fan and heatsinks for Raspberry Pi |
1 | 14.99 / 14.99 | |
| Total (Price Range) | 141.92 - 142.01 | ||
Note: Prices are based on Amazon.de listings as of June 2024 and may be subject to change.
The last editor of this page did not have the right to Embed PDFs into pages.
The last editor of this page did not have the right to Embed PDFs into pages.
This guide has been adapted from https://www.heimkino-praxis.de/leinwand-maskierung-schrittmotor-steuerung/ - many thanks to the author Bert Kößler
The color codings are specific to the Motors. Always verify these connections against the motor's datasheet, as even within the same model, there can be variations.
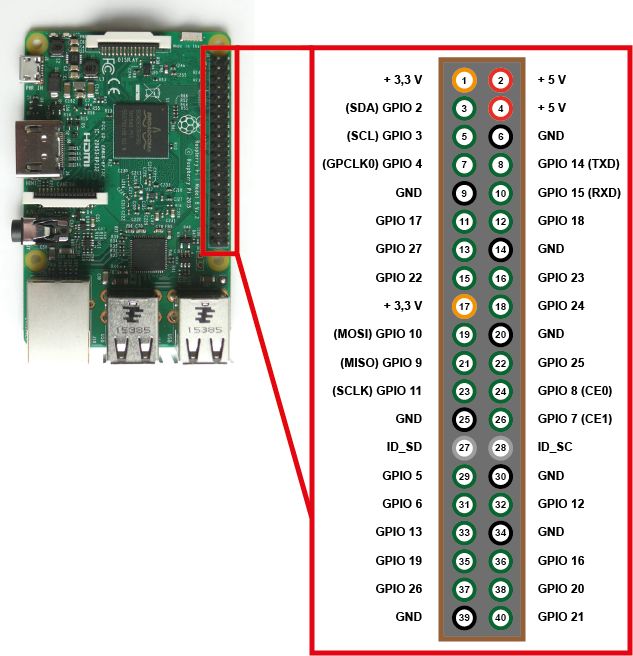
Make sure your software settings below fit the Pins you used!
 On one side of the driver, you'll find 6 small switches that configure the driver for your motor. The top of the driver should have a printed table explaining the switch settings. A barely visible arrow on the switch should indicate which position is "On".
Important: Always start with lower current settings and gradually increase. Too little current can cause weak motor performance and missed steps, while too much current can overheat and damage the motor.
Save the following code as stepper.py:
"""
stepper.py
Control two stepper motors connected to a Raspberry Pi through a TB6600 driver to sprinkle a lawn.
Author: Wolfgang, ChatGPT, Claude AI
Date: 2024-07 to 2024-08
"""
import RPi.GPIO as GPIO
import time
import argparse
from typing import Dict
class StepperMotor:
    def __init__(self, name: str, ena_pin: int, dir_pin: int, pul_pin: int, steps_per_revolution: int = 200):
        self.name = name
        self.ena_pin = ena_pin
        self.dir_pin = dir_pin
        self.pul_pin = pul_pin
        self.steps_per_revolution = steps_per_revolution
        self.setup_gpio()
    def setup_gpio(self):
        GPIO.setup(self.ena_pin, GPIO.OUT)
        GPIO.setup(self.dir_pin, GPIO.OUT)
        GPIO.setup(self.pul_pin, GPIO.OUT)
        GPIO.output(self.ena_pin, GPIO.HIGH)  # Start with motor disabled
    def enable(self):
        GPIO.output(self.ena_pin, GPIO.LOW)
    def disable(self):
        GPIO.output(self.ena_pin, GPIO.HIGH)
    def set_direction(self, clockwise: bool):
        GPIO.output(self.dir_pin, GPIO.HIGH if clockwise else GPIO.LOW)
    def step(self, steps: int, delay: float):
        for _ in range(abs(steps)):
            GPIO.output(self.pul_pin, GPIO.HIGH)
            time.sleep(delay)
            GPIO.output(self.pul_pin, GPIO.LOW)
            time.sleep(delay)
class Move:
    def __init__(self):
        GPIO.setmode(GPIO.BOARD)
        self.motors: Dict[int, StepperMotor] = {
            1: StepperMotor("Motor1", 37, 35, 33),
            2: StepperMotor("Motor2", 31, 29, 23)
        }
    def enable_motor(self, motor_id: int):
        motor = self.motors.get(motor_id)
        if motor:
            motor.enable()
        else:
            print(f"Motor {motor_id} not found")
    def disable_motor(self, motor_id: int):
        motor = self.motors.get(motor_id)
        if motor:
            motor.disable()
        else:
            print(f"Motor {motor_id} not found")
    def move_motor(self, motor_id: int, angle: float, speed_rpm: float, keep_enabled: bool = False):
        motor = self.motors.get(motor_id)
        if not motor:
            print(f"Motor {motor_id} not found")
            return
        steps = int(abs(angle) / 360 * motor.steps_per_revolution)
        delay = 30 / (speed_rpm * motor.steps_per_revolution)
        motor.enable()
        motor.set_direction(angle >= 0)
        motor.step(steps, delay)
        if not keep_enabled:
            motor.disable()
    def perform_pattern(self,
        horizontal_angle: float,
        horizontal_steps: int,
        vertical_angle: float,
        rpm: float):
        # Enable both motors before starting the pattern
        self.enable_motor(1)
        self.enable_motor(2)
        for _ in range(horizontal_steps):
            self.move_motor(1, horizontal_angle, rpm, keep_enabled=True)
            self.move_motor(2, vertical_angle, rpm, keep_enabled=True)
            self.move_motor(2, -vertical_angle, rpm, keep_enabled=True)
        # Reset horizontal position
        self.move_motor(1, -horizontal_angle * horizontal_steps, rpm, keep_enabled=True)
        # Disable both motors after completing the pattern
        self.disable_motor(1)
        self.disable_motor(2)
    def perform_pattern_by_args(self, pattern_args):
        # Default values
        params = {
            'steps': 80,
            'hangle': 160,
            'vangle': 120,
            'rpm': 10
        }
        # Parse provided arguments
        for arg in pattern_args:
            key, value = arg.split('=')
            if key in params:
                params[key] = float(value)
        # Execute the pattern
        self.perform_pattern(
            horizontal_angle=params['hangle'] / params['steps'],
            horizontal_steps=int(params['steps']),
            vertical_angle=params['vangle'],
            rpm=params['rpm']
        )
    def cleanup(self):
        for motor in self.motors.values():
            motor.disable()
        GPIO.cleanup()
        time.sleep(0.1)
# Modify main function to use the new approach
def main():
    parser = argparse.ArgumentParser(description="Control stepper motors")
    parser.add_argument("-m", "--motor", type=int, default=1, help="Motor ID (default: 1)")
    parser.add_argument("-a", "--angle", type=float, default=15, help="Angle to rotate (default: 15, positive for CW, negative for CCW)")
    parser.add_argument("-r", "--rpm", type=float, default=20, help="Speed in RPM (default: 20)")
    parser.add_argument("-k", "--keep-enabled", action="store_true", help="Keep motor enabled after movement")
    parser.add_argument("-p", "--pattern", nargs='*', metavar="KEY=VALUE",
                        help="Perform pattern: [steps=N] [hangle=DEG] [vangle=DEG] [rpm=RPM] default: steps=20,hangle=160,vangle=90,rpm=10")
    args = parser.parse_args()
    move_controller = Move()
    if args.pattern is not None:
        # For pattern, we'll handle enabling/disabling within the perform_pattern method
        move_controller.perform_pattern_by_args(args.pattern)
    else:
        # For single motor movement
        move_controller.move_motor(args.motor, args.angle, args.rpm, args.keep_enabled)
    move_controller.cleanup()
if __name__ == "__main__":
    main()
Save the following code as water and make it executable
chmod +x water
#!/bin/bash
# Bash script to control a two-motor garden hose system for watering a lawn
# Utilizes the updated stepper.py to turn two motors
# Define the path to your stepper.py script
STEPPER_SCRIPT_PATH="./stepper.py"
python3 $STEPPER_SCRIPT_PATH -p
To control the stepper motor directly: sudo python3 stepper.py --angle 90 --direction left --frequency-hz 500 --rpm 30
sudo is necessary for accessing the kernel memory directly.
To run the water control script: ./water 10
This will run 10 cycles of watering. Adjust the number as needed.
When searching for relevant patents we found:
Please note that this might not be the only patent relevant for this system
This patent, filed in 1993 (over 30 years ago), already attempted to create a "3D sprinkling" system by controlling the hose direction with two angles and the water flow. Key features include:
The patent abstract states:
An automatic robotic lawn sprinkler providing a water powered articulated, actuation and control system aiming a continuous stream of water to all coordinates within a polar coordinate system comprising a manually programmable base assembly for anchoring to the ground and containing size specific range data, an azimuth rotor assembly rotatably mounted to the base in a horizontal plane, a range rotor assembly rotatably mounted in a vertical plane substantially perpendicular to the azimuth rotor an azimuth actuation and control system range actuation and control system, and a mechanism for variably controlling range rate and flow volume.
This early attempt at robotic lawn sprinkler technology shows how much easier things are these days.
While the patent mention above has expired, it is important to note that there may be other active patents related to this system. The expiration of one patent does not guarantee freedom from all patent restrictions.
The effect of expired and potentially unknown patents on this DIY project:
Builders of this system are advised to use this information for personal, non-commercial purposes only. If you plan to commercialize or distribute this system, it is strongly recommended to consult with a patent attorney to ensure compliance with current patent laws.
This project is provided for educational and informational purposes only. The authors and contributors to this wiki page do not assume any legal responsibility for the use or misuse of this information.